Welcome to the enduring world of cast iron cooking! For generations, these sturdy, versatile pans have been a cornerstone of kitchens worldwide, cherished for their ability to deliver an unparalleled sear, retain heat efficiently, and develop a naturally non-stick surface that improves with every use. If you’ve recently acquired your first cast iron skillet, inherited a family heirloom, or simply wish to master the art of this timeless cookware, you’ve landed in the right place.
Many myths and misconceptions surround cast iron care, often making it seem more complicated than it truly is. Forget the fear of rust or the worry of ruining your pan. This comprehensive guide will demystify cast iron care, providing you with all the knowledge and step-by-step instructions needed to properly season, clean, maintain, and even restore your skillet. By the end, your cast iron pan won’t just be a piece of cookware; it will be a valued kitchen companion, ready to create countless delicious meals for years to come.
Understanding Cast Iron Seasoning: The Foundation of Non-Stick Cooking
The term “seasoning” in cast iron refers not to spices, but to the magical, slick, and protective layer that builds up on the pan’s surface. This isn’t just a layer of grease; it’s a meticulously formed, baked-on coating of polymerized oil. When a very thin film of cooking oil or fat is applied to cast iron and heated beyond its smoke point, the oil undergoes a chemical transformation called polymerization. During this process, the oil molecules break down, link together, and bond directly to the microscopic pores and crevices of the iron, creating a new, durable, and naturally non-stick polymer layer.
A robust layer of seasoning is paramount for two critical reasons:
- Superior Non-Stick Performance: A well-seasoned pan allows food to release effortlessly, making cooking and cleanup a breeze. Eggs glide, pancakes flip, and seared meats achieve a perfect crust without sticking. This natural non-stick quality eliminates the need for unhealthy chemical coatings found in many modern pans.
- Protection Against Rust: Unprotected cast iron is highly susceptible to rust when exposed to moisture. The polymerized seasoning acts as a vital barrier, sealing the iron surface from oxygen and water, thus preventing corrosion and preserving the integrity of your pan.
Think of seasoning as building a microscopic, incredibly tough plastic coating that’s fused to the metal. Each time you cook with fat and heat your pan, you’re contributing to this protective layer, making your skillet more non-stick and resilient over time. It’s a living surface that improves with consistent use and proper care.
Step-by-Step Guide: How to Season a Cast Iron Skillet for the First Time
Whether you’re unboxing a brand-new skillet (even those labeled “pre-seasoned” by manufacturers like Lodge Cast Iron can benefit from additional seasoning layers for optimal performance) or bringing a restored pan back to life, the initial seasoning process is crucial. The secret to a perfect, non-sticky finish lies in applying incredibly thin coats of oil and baking them on at a high temperature. Patience and repetition are your best allies here.
Here’s the definitive method to achieve a durable, non-stick seasoning:
- Step 1: Thoroughly Clean Your Skillet. Begin by washing your cast iron pan with warm, soapy water and a stiff brush or sponge. This step removes any factory waxes, protective coatings, or manufacturing residues. Rinse it completely.
- Step 2: Dry Completely. This is critical. Immediately after washing, dry the pan meticulously with a clean towel. To ensure every last molecule of moisture is evaporated, place the skillet on a stove burner over medium-low heat for 3-5 minutes, until it’s visibly dry and warm to the touch. Moisture is the enemy of cast iron.
- Step 3: Apply an Ultra-Thin Layer of Oil. Once the pan is warm (but comfortable enough to handle), pour approximately a teaspoon of your chosen seasoning oil (see recommendations below) into the pan. Using a lint-free cloth or paper towel, rub the oil over every single surface of the skillet: the inside, outside, handle, and bottom. Every inch should have a thin sheen.
- Step 4: The Crucial Wipe-Off. This is the most counterintuitive yet vital step. Take a fresh, clean paper towel and wipe the entire pan down again, as if you’re trying to remove every trace of oil you just applied. The goal is to leave only a microscopic film of oil in the pores of the iron. If the pan looks wet, shiny, or greasy, you’ve left too much oil. An overly thick layer will result in a sticky, uneven, or splotchy seasoning. The pan should appear almost dry, with just a faint sheen.
- Step 5: Preheat Oven and Prepare for Baking. Preheat your oven to a high temperature, typically between 450-500°F (230-260°C), which is well above the smoke point of most seasoning oils. To catch any potential drips (though with proper wiping, there should be none), place a large sheet of aluminum foil on the bottom rack of your oven.
- Step 6: Bake Upside Down. Place your skillet upside down on the center oven rack. Baking it inverted prevents any residual oil from pooling in the bottom of the pan, which can lead to sticky spots or an uneven finish.
- Step 7: Let It Polymerize. Bake the skillet for one full hour. You might notice a bit of smoke, which is perfectly normal – this signifies the oil is polymerizing. After one hour, turn off the oven but leave the skillet inside to cool down completely, which can take several hours. This slow cooling helps the seasoning to cure properly and harden.
- Step 8: Repeat for Durability. One layer of seasoning is a good start, but three to five (or even more for vintage pans) will build a truly hard, durable, and beautifully slick cooking surface. Allow the pan to cool completely between layers before re-oiling and rebaking.
Choosing the Best Oil for Seasoning Your Cast Iron
While most cooking oils can technically be used for seasoning, some are far superior due to their chemical composition and smoke points. The ideal seasoning oils are high in polyunsaturated fatty acids and have a high smoke point, ensuring they polymerize effectively without burning or leaving a sticky residue. Avoid oils with low smoke points or those that are primarily monounsaturated or saturated fats for initial seasoning.
Here are the top contenders for building robust seasoning:
- Grapeseed Oil: This is arguably one of the best all-around choices for seasoning. It boasts a very high smoke point (around 420°F/215°C), a neutral flavor, and consistently polymerizes into a hard, non-flaky, and dark finish. It’s readily available and a favorite among cast iron enthusiasts for its reliability.
- Canola Oil / Vegetable Oil (Soybean Oil Blend): These are excellent, affordable, and widely accessible options. With smoke points typically ranging from 400-450°F (204-232°C), they create a reliable and durable seasoning. They are good choices for beginners due to their forgiving nature.
- Flaxseed Oil: Often lauded as the “holy grail” of seasoning oils, flaxseed oil (especially cold-pressed) creates an incredibly hard, glass-like finish. Its high polyunsaturated fat content allows for strong polymerization. However, it’s expensive and can be quite finicky; if not applied in perfectly thin layers, flaxseed oil seasoning can be prone to flaking or chipping, making it less ideal for novices. It also has a lower smoke point (around 225°F/107°C) which means you need to adjust oven temperatures or accept more smoke.
- Crisco (Solid Vegetable Shortening): A traditional choice for a reason, Crisco is effective and creates a good, durable seasoning. It’s solid at room temperature, making it easy to apply a thin layer. Its smoke point is around 360°F (182°C).
Oils to Avoid for Initial Oven Seasoning: Oils with very low smoke points like extra virgin olive oil, butter, or coconut oil are not suitable for the high-heat, initial seasoning process. They tend to burn before polymerizing properly, leading to a sticky, uneven, or rancid finish. Save these flavorful fats for cooking in your already well-seasoned pan.
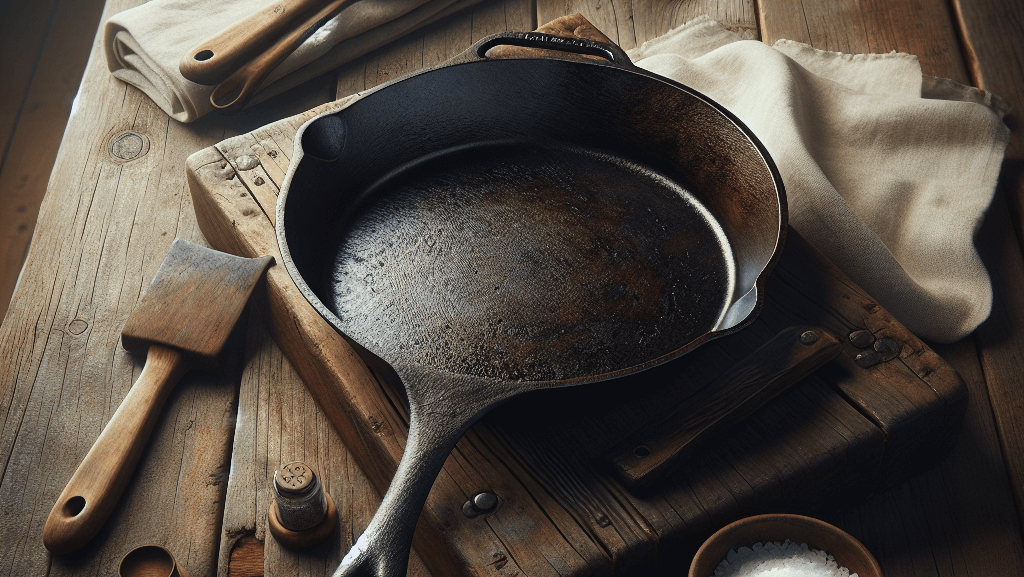
Recognizing a Perfectly Seasoned Skillet
Knowing what a properly seasoned skillet looks and feels like is key to confident cast iron ownership. You’ll know your seasoning is performing optimally when your pan exhibits these characteristics:
- Appearance: A well-seasoned pan will develop a deep, uniform, semi-glossy black or very dark brown finish. It shouldn’t look overly shiny, wet, or greasy. The color will darken and deepen with each layer of seasoning and continued use.
- Feel: The surface of the skillet should feel remarkably hard and smooth to the touch, almost like polished stone. There should be no stickiness, tackiness, or bumpy texture anywhere on the seasoned surface. It should feel dry and slick.
- Performance: This is the ultimate true test. When your pan is ready, foods like fried eggs will glide around effortlessly, pancakes will release cleanly, and seared meats will develop a beautiful crust without leaving stubborn stuck-on bits. Cleanup will be remarkably easy, often requiring just hot water and a brush.
Remember, seasoning isn’t just about initial application; it’s a living surface that continues to improve and darken with consistent, proper use. Don’t worry if it’s not perfectly black after the first few rounds; it will get there with time and cooking.
The Daily Clean: How to Wash Cast Iron Without Ruining the Finish
Cleaning your cast iron pan immediately after cooking is the best way to maintain its seasoning and prevent food from sticking over time. It’s a quick and straightforward process once you get the hang of it.
- Clean While Still Warm: The easiest time to clean cast iron is when it’s still warm (but not scalding hot). The warmth helps release any food residue more easily.
- Scrape Excess Food: Use a pan scraper, a wooden spoon, or a sturdy spatula to gently scrape out any remaining food particles from the pan. Avoid using sharp metal spatulas or knives that could scratch the seasoning.
- Wash with Hot Water and a Scrubber: Under hot running water, use a stiff-bristled brush, a non-scratch sponge, or a dedicated cast iron scrubber (like a chainmail scrubber) to scrub the pan clean. For particularly stubborn, stuck-on bits, a chainmail scrubber is an incredibly effective tool that scrapes away grime without damaging your precious seasoning. Alternatively, you can make a paste with a tablespoon of coarse kosher salt and a little water; the salt acts as a gentle abrasive to lift off residue.
- Rinse Thoroughly: Ensure all food particles and cleaning agents are rinsed away.
- Dry Immediately and Thoroughly: This step cannot be stressed enough. Immediately after rinsing, towel dry your skillet until it appears completely dry. Then, place it on a stove burner over low heat for 1-2 minutes to evaporate any remaining residual moisture. A pan left to air dry, even for a short period, is highly prone to developing rust spots.
- Apply a Maintenance Coat of Oil: While the pan is still warm from the stovetop drying, add just a few drops (about a quarter-teaspoon) of your regular cooking oil (e.g., canola, vegetable, grapeseed) to the cooking surface. Use a paper towel to rub this thin layer evenly over the entire interior of the pan. This step replenishes and protects the seasoning, keeping your pan ready for its next culinary adventure. Wipe off any excess oil; the pan should look dry, not greasy.
Common Cleaning Mistakes to Avoid (Yes, You Can Use Soap!)
Let’s unequivocally bust the most pervasive and persistent myth in cast iron care: you can absolutely use a small amount of modern dish soap to clean your cast iron skillet. The long-held belief that soap is forbidden dates back to a time when soaps were made with lye, a highly corrosive alkaline substance that would indeed strip seasoning. Today’s mild dish soaps are simply degreasers. They are designed to break down fats and oils, but they are not strong enough to dissolve the hardened, polymerized bond of a properly formed seasoning layer. If your pan is particularly greasy, or if you’ve cooked something with a strong odor, a little soap and water is perfectly fine and often recommended. Just ensure you follow the crucial steps of drying and applying a maintenance oil coat afterward.
Here are the actual mistakes that truly harm your cast iron:
- ❌ Soaking the Pan: Leaving your cast iron skillet to sit in water, especially overnight, is the fastest way to invite rust. Cast iron is porous and will absorb water, leading to corrosion.
- ❌ Putting it in the Dishwasher: The harsh detergents, high heat, and prolonged exposure to moisture in a dishwasher environment will strip your hard-earned seasoning, cause severe rust, and likely pit the pan’s surface. Cast iron is strictly a hand-wash-only item.
- ❌ Air Drying: As mentioned, air drying allows moisture to linger on the surface long enough for rust spots to form, particularly in humid environments. Always dry on the stove.
- ❌ Using Steel Wool (on a seasoned pan): While useful for aggressive rust removal during restoration, regular scrubbing with abrasive steel wool on an already seasoned pan can scratch and remove your polymerized layer. Stick to less abrasive scrubbers for daily cleaning.
- ❌ Using Metal Utensils with Sharp Edges: While you can use metal spatulas in a seasoned cast iron pan, avoid those with very sharp or pointed edges that could gouge or chip the seasoning. Rounded or beveled edges are fine.
How to Maintain Your Seasoning for a Lasting Non-Stick Surface
Seasoning isn’t a static achievement; it’s an ongoing, dynamic process that continuously improves with proper care and, most importantly, consistent use. The best way to maintain and enhance your seasoning is to simply cook with your cast iron skillet regularly!
- Cook with Fats: Every time you fry bacon, sear a steak, sauté vegetables in oil, bake cornbread, or cook anything with some fat, you are naturally contributing to and strengthening your pan’s seasoning layers. The heat from cooking helps to further polymerize and harden the existing seasoning, as well as incorporate new fat.
- Avoid Highly Acidic Foods (Especially Initially): For a brand-new or freshly re-seasoned pan, avoid cooking highly acidic foods like tomato sauce, lemon juice, or simmering wine for extended periods. Acid can strip a weak or immature seasoning layer. Once your pan has developed a robust, well-established, slick, and dark patina (after several months of regular use), it will be much more resilient and can handle occasional acidic dishes without a problem. Just be sure to clean and oil it immediately afterward.
- Perform Stovetop Maintenance: The post-wash oiling ritual is your single most important maintenance step. This quick, 30-second habit after every wash keeps your pan protected, prevents rust, and continues to build up the seasoning over time. It’s far more effective than infrequent, full oven re-seasoning.
- Avoid Extreme Temperature Changes: Rapid temperature changes, like plunging a very hot pan into cold water, can cause thermal shock which may warp the pan or even crack it, especially vintage pieces. Allow your pan to cool down naturally before washing.
Consistency is key. The more you cook with your cast iron and follow the simple cleaning and oiling steps, the better its seasoning will become, transforming it into an indispensable kitchen workhorse.
From Rusty to Ready: A Complete Restoration Guide
Don’t despair if you find a rusty cast iron pan, whether it’s an old find from a flea market or a neglected skillet from the back of your cabinet. Cast iron is incredibly resilient, and restoring a rusty pan is a rewarding process that brings new life to an old friend. For light to moderate surface rust, follow these steps:
- Scrub the Rust Away: For minor rust, use a piece of coarse steel wool (like Brillo or SOS pads, without the soap if possible) or a chainmail scrubber, along with a bit of water, to vigorously scrub away all visible rust. You can also use a paste of baking soda and water, or a mixture of coarse salt and a little cooking oil, as an abrasive. For more stubborn or widespread rust, create a 50/50 solution of white vinegar and water. Submerge the pan in this solution for no more than 30-60 minutes (leaving it longer can cause the acid to start pitting the iron itself). The vinegar will loosen the rust, making it much easier to scrub off.
- Wash Thoroughly: After derusting, wash the pan vigorously with hot, soapy water and a stiff brush to remove all rust particles, any remaining vinegar residue, and loose crud. You want a perfectly clean, bare metal surface.
- Dry Completely and Immediately: This step is critical after rust removal. Towel dry the pan completely, then place it on a stove burner over medium heat for 5-10 minutes to ensure it is absolutely bone-dry. Any lingering moisture will immediately lead to new rust.
- Re-season Immediately: Once the pan is dry and still warm, it is now bare, vulnerable iron. You MUST immediately begin the full oven seasoning process outlined in the “How to Season a Cast Iron Skillet for the First Time” section. Apply at least 3-4 new, thin layers of seasoning to build back a protective and non-stick base. The pan will be very thirsty for oil after being stripped.
Stripping Your Skillet: When and How to Start Over
Sometimes, a simple rust removal or light scrub isn’t enough. You may need to completely strip the pan down to bare metal if you’re dealing with:
- Thick, caked-on carbon buildup or gunk that won’t scrub off, often from years of improper cleaning or burnt-on food.
- A severely flaking or uneven seasoning that is beyond patching or minor repair.
- A vintage find with an unknown history, where you want to ensure it’s completely clean and re-seasoned from scratch.
- A persistent rancid smell, often caused by old, poorly applied, or spoiled oils that have not properly polymerized.
Here are two highly effective methods for stripping cast iron:
- Yellow-Cap Easy-Off Oven Cleaner Method: This is a widely accessible and effective method. In a well-ventilated area (preferably outdoors or with excellent ventilation) and wearing chemical-resistant gloves and eye protection, spray the entire pan (inside and out) thoroughly with yellow-cap Easy-Off oven cleaner (ensure it contains Lye/Sodium Hydroxide). Place the pan inside a heavy-duty trash bag, tie it shut, and let it sit for 1-3 days. The lye will chemically break down the old seasoning and gunk. After the waiting period, open the bag (still wearing gloves), and use a stainless steel scrubber under running water to scrub off the softened residue. Wash thoroughly with soap and water, dry immediately and completely on the stove, and then proceed with the full oven seasoning process.
- Lye Bath Method: This is the gold standard for serious collectors and those with multiple pans to strip, as it’s highly effective and generally safer for the pan than extreme heat methods. It involves creating a solution of lye crystals and water in a designated plastic tub. Pans are submerged for several days, safely dissolving all old seasoning and carbon. This method requires strict safety precautions: always add lye to water, never water to lye; use heavy-duty chemical-resistant gloves, eye protection, and work in a well-ventilated area. After soaking, remove the pan (with gloves), scrub clean, wash, dry, and re-season.
Avoid the “Self-Cleaning Oven” Method: While tempting, using your oven’s self-cleaning cycle to strip cast iron is highly discouraged. The extreme temperatures (often over 900°F/480°C) can cause thermal shock, leading to warping, cracking, or even making the pan brittle. It can also fill your home with noxious fumes from burning off old seasoning.
Properly Storing Your Cast Iron Cookware
Once your cast iron is clean, dry, and lightly oiled, proper storage is simple but essential for preventing rust and keeping your pans in prime condition.
- Ensure It’s Bone Dry: Always double-check that your pan is completely dry and has its light maintenance coat of oil before storing.
- Allow for Air Circulation: Store your skillet in a dry cabinet or, ideally, hang it on a pot rack or pegboard. If storing in a cabinet, ensure there’s good airflow.
- Avoid Trapping Moisture: Never store your cast iron skillet with the lid on, especially if the lid is also cast iron or tight-fitting. This can trap humidity inside the pan, creating a perfect environment for rust to form. If you must store with a lid, place a paper towel between the pan and the lid.
- Prevent Scratches When Stacking: If you stack your cast iron pans, always place a layer of paper towel, a cloth, or a pan protector between each one. This prevents the seasoning from getting scratched or chipped and also helps to wick away any trace moisture.
- Avoid Damp or Humid Environments: Don’t store cast iron in basements, garages, or other areas prone to high humidity, as this greatly increases the risk of rust.
Troubleshooting Common Cast Iron Issues: Sticky Spots, Flaking, and Unevenness
Even with the best care, you might occasionally encounter minor issues with your cast iron. Most are easily fixable!
- Sticky or Tacky Spots: This is the most common beginner problem and is almost always caused by applying too much oil during the seasoning process. The excess oil pools and doesn’t fully polymerize, turning into a gooey or sticky mess rather than a hard coating. The fix: Firmly scrub the sticky spot with a stiff brush, a little soap, or a chainmail scrubber to remove the excess oil. Then, place the pan (upside down) in a 500°F (260°C) oven for another hour to fully cure any remaining excess oil. Ensure your next oil applications are extremely thin.
- Flaking or Chipping Seasoning: If your seasoning is flaking off in patches, it could be due to a few reasons: the oil layer was too thick, the pan wasn’t perfectly clean before seasoning (preventing proper adhesion), or you used an oil like flaxseed improperly. The fix: Use a metal spatula or steel wool to scrape off all the loose, flaky bits. Give the pan a good wash, dry it thoroughly on the stove, and then apply one or two new, very thin layers of oven seasoning to patch and rebuild the area. Continue to cook with it; the patch will blend in over time.
- Uneven or Splotchy Appearance: If your seasoning looks splotchy, uneven, or has lighter areas, it’s usually just a cosmetic issue rather than a performance problem. This can be caused by uneven heating (common on gas or electric coil stoves), or simply that some areas get more contact with fat during cooking than others. The fix: This almost always resolves itself with continued cooking and regular stovetop oiling. Just keep using your pan; the seasoning will even out and darken over time.
- Food Sticking: If food is consistently sticking despite a seemingly good seasoning, it could be a few things: the pan isn’t hot enough before adding food, you’re not using enough cooking oil, or your seasoning simply needs more layers and use to become truly non-stick. The fix: Ensure your pan is preheated sufficiently (a drop of water should sizzle and evaporate immediately). Use a decent amount of cooking fat for the type of food you’re preparing. If the seasoning still feels inadequate, apply a few more layers of oven seasoning.
Caring for cast iron is a skill that beautifully blends practical science with culinary tradition. By understanding how seasoning works, diligently following simple cleaning and drying routines, and consistently cooking with your skillet, you’re not just maintaining a piece of cookware – you’re actively creating a kitchen heirloom. This durable, naturally non-stick pan will serve you and your family with delicious, perfectly cooked meals for many generations to come. So, embrace the journey, get that skillet on the stove, and start building your legacy, one incredible meal at a time.
Frequently Asked Questions About Cast Iron Care
How often do I need to re-season my cast iron pan?
You don’t need to perform a full oven re-seasoning very often if you properly maintain your pan. The most effective practice is to do a ‘stovetop seasoning’ after each wash: simply wipe a very thin layer of cooking oil onto the warm, dry pan. A full, multi-layer oven seasoning is typically only needed when you first acquire the pan, after a complete restoration/stripping, or perhaps once a year if you feel the surface needs a major boost in non-stick properties or protection.
What is the absolute best oil to use for seasoning cast iron?
The best oils for seasoning possess a high smoke point and are rich in polyunsaturated fats, which promote strong polymerization. Grapeseed oil is consistently a top-tier choice due to its excellent durability, ease of use, and neutral scent. Canola oil, vegetable oil (soybean blend), and sunflower oil are also excellent, affordable, and readily available options that produce reliable seasoning. While flaxseed oil can create an incredibly hard finish, it’s often more prone to flaking if not applied perfectly, making it less recommended for beginners.
Why is my cast iron seasoning sticky or flaky?
A sticky or tacky seasoning is almost always a sign of using too much oil during the seasoning process. The excess oil didn’t fully polymerize and instead cured into a gooey residue. Flaky seasoning can occur if the oil layer was applied too thickly, or if the pan wasn’t perfectly clean before seasoning, leading to poor adhesion of the polymer. The straightforward solution for both is to scrub the affected area vigorously to remove the problematic seasoning, then apply a new, incredibly thin layer of oil and bake it on properly.
Is it truly okay to use soap on a cast iron skillet?
Yes, absolutely! The pervasive myth that soap is forbidden stems from the era of harsh, lye-based soaps that would indeed strip seasoning. Modern, mild dish soap is simply a degreaser; it is not strong enough to harm the hardened, polymerized bond of a well-formed seasoning layer. It’s perfectly fine, and often beneficial, to use a small amount of soap to clean a particularly greasy or smelly pan. Just ensure you rinse thoroughly, dry the pan completely on the stove, and apply a thin maintenance coat of oil afterward.
How do I fix a rusty spot on my cast iron pan?
For a small, isolated spot of surface rust, simply scrub the area with steel wool, a chainmail scrubber, or a paste of coarse salt and a little cooking oil until the rust is completely gone. Wash the pan, dry it immediately and thoroughly on the stove, and then rub a very thin layer of oil over the entire cooking surface to protect the newly exposed iron. For more widespread or severe rust, a full restoration process, as detailed in the guide above, will be necessary to bring the pan back to optimal condition.
Can a cast iron pan be ruined beyond repair?
It is exceptionally difficult to permanently ruin a cast iron pan. Almost all common issues – including rust, thick caked-on crud, or a completely failed seasoning – can be remedied by stripping the pan down to bare metal and meticulously re-seasoning it. The only scenarios that truly render a cast iron pan irreparable are severe physical damage like a deep crack, a significant warp from extreme thermal shock (e.g., plunging a red-hot pan into ice-cold water), or widespread holes from extreme, prolonged rust-through, all of which are remarkably rare under normal use.